It is the day before Christmas Eve and K.C. is on his way from New Jersey, Amanda is working her last shift at Outback until after Christmas. I am so excited to have my children home and give them their Christmas presents! I still enjoy finding the perfect surprise gift for them, I still enjoy celebrating the Holiday with them. I think I enjoy the holiday just as much as when they were little.
Karl is making up the toppings for the wood fired pizza we will have tonight! Tonight seemed like the perfect night to make pizza. We wanted something easy and pizza is so easy, we wanted something special and pizza in our brick oven is always a special treat. Karl is in charge of the whole deal tonight and he made a new pizza dough recipe that I will share with you. In fact Karl and my children will be making all the holiday meals this year! I think having this cast might be not so bad after all. I am thinking this could start a whole new tradition in our house!
I want to wish everyone a wonderful holiday! We have done so well with our Round Boy Ovens this year! It has been a exciting and successful year for us and we are looking forward to a web site that K.C. is working on with a web designer and maybe some new design features that Harry and Karl have planned. I hope everyone who owns a Round Boy Oven is enjoying some holiday brick oven meals! I would be so happy if you would share with me your favorite recipe for me to post for everyone. We will also be sharing on the web site the very creative designs our customers have used with their Round Boy ovens. We appreciate and have enjoyed talking to all our customers and future customers this year. The best part has been the people we have met! So I hope Santa is good to you all and next year is healthy and happy!
Thanks for reading my Blog, Lisa
From the book PIZZA GRILL IT, BAKE IT, LOVE IT! by Bruce Weinstein and Mark Scarbrough
Olive Oil Pizza Dough
1/2 cup luke-warm water (105*f)
1 1/2 teas active dry yeast
1/2 teas sugar
1/2 teas salt
2 cups bread flour
1/4 cup olive oil
Stir warm water, yeast , sugar and salt in bowl. Set aside for 5 min. for yeast to foam. Add flour and olive oil to yeast mixture. Attach dough hook and stir at med. speed until combined. Continue beating at med. speed for 7 min.
Wipe a clean large bowl with olive oil and place the dough in bowl turning so all sides are coated. Cover with plastic wrap and set aside in a warm draft free place( I use the microwave) for about 2 hours or until doubles in size. Shape and make dough balls the size you need ( I like 10 oz.). Enjoy!

Thursday, December 23, 2010
Sunday, December 19, 2010
Chef Karl and Pigs in a Blanket!
I have my foot in a cast since Monday and for a month more! I have Tarsal Tunnel in my right foot and having a cast and crutches is a learning experience like none other....
A few things I have learned.
I am clumsy!
Using crutches while two sheepdogs circle around me is dangerous (yes, I know I have a sheepdog and a little cockapoo but you try telling her she is not a sheepdog.)
I have a great husband who reminds me to be positive.
I have a great partner and co workers and they have kept our salon running during Christmas and have taken care of my clients holiday hair needs without missing a beat.
I can enjoy the holiday season without shopping and taking advantage of all the bargains. ( I am a shopaholic and this may have cured me)
I love Christmas movies and Specials ( I have never had time to watch them in the past because I was too busy shopping and working to make money to shop)
I can knit a beautiful sweater when I am forced to sit on my butt! (pictures to follow)
I need practice at not being in control and a month in a cast should do it.
My husband Karl is really a good chef and will try anything in a brick oven because for him that is the way to cook!
So here is how Karl made "Pigs in the Blanket" and they are done in our brick oven.
The Recipe
2 small or 1 large cabbage
11/2 lbs ground beef
1/2 lbs ground pork
1 cup of cooked rice
2 eggs
1 onion diced
can of tomatoes ( we used our home canned tomatoes)
4 slices bacon
salt pepper and allspice
First boil water and Blanche the cabbage to soften the leaves. Removing the outer leaves as they soften.
mix together ground beef, ground pork, eggs, onion, rice and salt, pepper and allspice.
roll ground beef mixture up in the cabbage leaves. Layer in a oven safe pot ( we used a ceramic dutch oven) starting with tomatoes then "piggies" ending with Tomatoes. Top with 4 slices of uncooked bacon.
The oven: Bring brick oven to white hot and let cool down to 400*. Place pot in oven, we did not use a door but kept a small fire going to keep oven temperature around 400*. Karl turned the pot every 1/2 hour and he timed them for 2 hours.
They came out delicious with a slight smokey flavor. Karl has proven himself to be a great wood fired oven chef. This means I get a break from cooking! ( at least while the cast is on)
 | |
| Before putting in the oven |
 |
| baking with a small fire |
 |
| Perfect! |
 |
| MMMMmm! |
 |
| My sweater all done! |
Friday, December 17, 2010
Wood Fired Thanksgiving Feast
| For Information on RoundBoy Brick Ovens call Karl 570-885-3269 or Harry 570-885-3268 |
I am still amazed out how good everything comes out when we make it in the brick oven. We really enjoy this oven as a family. I am so happy that it brings my kids back home! Karl and I are not big vacationers and having something else we enjoy in our back yard for us is better then going away on vacation!
Karl brought the oven up to white hot (bricks on top of oven inside turn white). He let the oven cool to 475* to 500* and kept a small fire going while roasting the turkey. He did not use a door on the oven. I coated the turkey with olive oil and used a seasoned salt rub. I placed the turkey on a rack in a roasting pan and covered with foil. Karl turned the turkey every 1/2 hour. He removed the foil the last hour to let the turkey brown. It roasted for about 3 hours and a internal temperature of 165*. We let it sit for a 1/2 hour and sliced. The turkey was a little pink by the skin because it was wood fired.
 |
| Keep a small fire while roasting and turn every 1/2 hour |
 |
| Internal temperature of 165* |

 |
| Perfect |
 |
| Charlie taking a break from watching the brick oven to enjoy the snow. |
 |
| Wood fired also! |
Monday, November 1, 2010
2nd Annual O'hara Orchard Cider Making Day!
 |
| Fresh hot apple pie! |
 |
| Everyone enjoyed the day and took home apples and pie |
 |
| This Round Boy Oven should be retired to the museum! |
 |
| Fun in the leaves! |
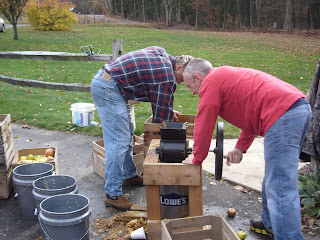 |
| Hard at work |
 |
| Mmmmm |
 |
| The deer will love this! |
 |
| Lots of apples to go! |
 |
| Thanks Chris and Joe for a great Fall day! |
 |
| Waiting for pizza.... |
Sunday, October 10, 2010
Chicken under a Brick!
| For information Contact Karl 570-885-3269 |
Chicken under a brick seemed very interesting to me when I read the recipe. It came from my favorite wood fired oven book - THE ART Of WOOD FIRED COOKING by Andrea Mugnaini.
We also made roasted asparagus and roasted potatoes from the same book. What a feast we had! The preparation was so easy and the clean up even easier for a meal that looked and tasted like we spent hours. The tricks to the chicken were to have a whole chicken deboned by the friendly butcher at Wegmans and the Aromatic salt recipe from the book. The fire was easily managed and all of this was in the book. Oh and the bricks on top of the chicken was the best trick!
We started the fire and brought the oven up to pizza temp. and then kept a vertical flame extended up the wall only and the temp. at the floor of around 550* We kept adding small wood to keep the flame extended up the wall and maintain our temp of 550*
We started with our roasted potatoes first because they took about 30 minutes. The chicken was next heating the bake sheet in the oven first then adding the chicken with 2 bricks covered in foil on top for the first 15 minutes. We removed the bricks and roasted for another 30 minutes. Last we put in the asparagus! The next time I make this meal I will use smaller pans and keep the potatoes and chicken in the oven farthest from flame while the other items roast. This time I took them out and put in my regular oven to keep warm.
The recipe for the Aromatic Salt used to season the chicken
2 cups fine sea salt
1 cup finely chopped mixture of rosemary,sage,thyme, and parsley
1 lemon for zesting
Place salt and herb mixture on a sheet and toss together. Hold lemon over salt mixture and zest. Toss again. Mixture can be used now or dried at room temp. for 48 hours and kept in fridge for use later.
I hope you enjoy!


 |
Sunday, October 3, 2010
Apple Dumplings!
A beautiful Fall day a brick oven and apple dumplings! Enough said!
Apple Dumplings
2 cups flour
2 tsp. baking powder
1tsp. salt
2/3 cup Crisco
1/2 cup milk
6 medium Cortland or Mutsu apples
Cut shortening into flour, salt and baking powder. Add milk. roll onto a floured counter into a rectangle. Cut into 6 squares.
Core and peel apples. Place apple onto a square of pastry. Pull opposite corners up to meet and fold pastry over apple, crimp edges. Place in a 9x13 baking dish.
Sauce
1 1/2 cups water
1 1/2 cups sugar
1/4 tsp. cinnamon
1/4 tsp. nutmeg
3 TBS. butter
Bring to a boil. Pour sauce over dumplings. Bake at 375* for 35 to 40 minutes.
Oven prep. Fire oven until dome turns white. Take the fire out and put the door on and block chimney. Wait 1 hour for the heat to even out and cool down to 425*. We baked the dumplings uncovered in 13x 9 pan for 45 min. with the door and chimney closed. The apples were still a little crisp.
 |
| Before baking |


 |
| Mmmmm! |
 |
| The leaves are starting to turn colors |
Friday, September 3, 2010
Coney Island Catering in my backyard!
Today Karl and I had a nice treat when Coney Island Catering came by to check out our Round Boy Oven. They were kind enough to bring all the ingredients and make us their wood fired pizza in our oven! WOW! These boys make a good pizza! They gave me all the tricks to a great wood fired pizza the Coney Island way. They have a wood fired pizza oven that they take on the road and cater events. What a great business they have. I really enjoyed the afternoon with such hard working entrepreneurs who have the recipe for success! They even left me the ingredients to make pizza for K.C. tonight when he gets home from New Jersey. Coney Island Catering caters in New Jersey and New York and you can check them out at http://www.coneyislandcatering.com/ and be sure and check out their face book page and the events they will be serving pizza at. I know Karl and I will be making a point to attend a event they cater the next time we are visiting K.C.
We have been having a lot of fun starting our new business Round Boy Outdoor Products. I am thrilled that our ovens are making their way around the country! I love meeting new people and exchanging recipes and ideas.
I like what Jed from Coney Island Catering said about pizza " There is no wrong way to make a pizza, everyone has their own way they like pizza!". I agree and it is really fun trying all the different styles of pizza. If only pizza was zero calorie!

Saturday, August 21, 2010
I am in Love!
I finally found 00 flour! The difference in my pizza crust was amazing! The first difference was how nice the dough pressed out. No rolling pin was needed! Karl had a little trouble sliding the pizza off the peel and into the oven even with a corn meal dusting. The next difference was how wonderful the dough baked and the last difference was the taste! Crispy and sweet! What a pleasure the dough was in preparation and taste.
Karl,Amanda and I had a feast and we felt sad for all the people in the world without a brick oven in their backyard! I am sharing the recipe and pictures of the best pizza to date in our backyard! The recipe again comes from Peter Reinhart and if you have a Round Boy Oven you need his books American Pie and The Bread Baker's Apprentice.
Pizza Dough Recipe with 00 Flour
from The Bread Baker's Apprentice by Peter Reinhart
4 1/2 cups (20.25 ounces) unbleached high-gluten, bread, or all-purpose flour, chilled
1 3/4 (.44 ounce) teaspoons salt
1 teaspoon (.11 ounce) instant yeast
1/4 cup (2 ounces) olive oil (optional)
1 3/4 cups (14 ounces) water, ice cold (40°F)
Semolina flour OR cornmeal for dusting
I mixed all ingredients in my Kitchen Aid Mixer. Mix until dough cleans side of bowl and sticks to the bottom of bowl. The dough should be tacky not sticky. I did need to add more flour as the dough was very wet. I divided into 3 equal balls coated in olive oil and put in zip lock bags. I let sit out for 15 minutes and the put in refrigerator over night. I took the dough out of the refrigerator 2 hours before making the pizza. The dough was perfect!

 I know this sounds like a lot of work for pizza but it took 20 minutes of prep on Thursday night to make the dough and the hardest part on Friday after work was remembering to get the dough out 2 hours before we wanted to make pizza!
Karl,Amanda and I had a feast and we felt sad for all the people in the world without a brick oven in their backyard! I am sharing the recipe and pictures of the best pizza to date in our backyard! The recipe again comes from Peter Reinhart and if you have a Round Boy Oven you need his books American Pie and The Bread Baker's Apprentice.
Pizza Dough Recipe with 00 Flour
from The Bread Baker's Apprentice by Peter Reinhart
4 1/2 cups (20.25 ounces) unbleached high-gluten, bread, or all-purpose flour, chilled
1 3/4 (.44 ounce) teaspoons salt
1 teaspoon (.11 ounce) instant yeast
1/4 cup (2 ounces) olive oil (optional)
1 3/4 cups (14 ounces) water, ice cold (40°F)
Semolina flour OR cornmeal for dusting
I mixed all ingredients in my Kitchen Aid Mixer. Mix until dough cleans side of bowl and sticks to the bottom of bowl. The dough should be tacky not sticky. I did need to add more flour as the dough was very wet. I divided into 3 equal balls coated in olive oil and put in zip lock bags. I let sit out for 15 minutes and the put in refrigerator over night. I took the dough out of the refrigerator 2 hours before making the pizza. The dough was perfect!


Wednesday, August 11, 2010
Creative Round Boy oven owners!
 |
| Round Boy Oven in Terra Cotta on stand |
 |
| Grey Round Boy Oven with a Versa Lock base |
.jpg) |
| Grey Round Boy Oven installed by home owner into outdoor kitchen |
 |
| Round Boy Oven with a Cultured Stone exterior designed by Kemmerer Masonry |
 |
| Field stone and brick with rope joints and a custom oven design. Designed by Kemmerer masonry |
Saturday, July 10, 2010
Monday, July 5, 2010
Independence Day!
This 4th of July the party at my house was my kid's party! As I looked out across my yard at these adults that I watched grow I thought about how independent they are! My son a C.P.A. and my daughter graduating next year from college and already doing her internship. Frank, my son's friend since playschool, working in accounting, living in Philadelphia. He has a really sweet girlfriend and I must say I am proud of him! Ray is on his way to Law School already has a degree in accounting. He also is living in Philadelphia! I am proud of him! Andy working towards becoming a doctor, Wey working in computers! I am proud of all of them!
I am so thankful that after growing up and becoming" Independent " my children still like to hang out with Karl and I! They like to bring their friends over and hang out with my friends! This is a great time for Karl and I, we do not have as much responsibility towards our kids. They have become are friends and we really do enjoy them! I like how "Independent" they are! I like having them around! The day after the Party I noticed someone wrote on my blackboard "Karl and his family Rock". I laughed and thought no! You kids rock and you can come here anytime and hang out!
You are probably wondering what this has to do with a Brick Oven? The party of course was around the oven. We served 20 Pizzas and the oven was the main attraction! We had Lillian, Franks mom, baking pies! George had a shift at the oven! Joe, of course always eager to help me with the pizza!
The Fireworks were awesome thanks to Frankie and K.C.
I want to thank Craftmetal for making a pizza prep counter for me! I really like the insulated well for my toppings! I love being able to make pizza in the barn next to the oven!


Thanks Craftmetal!
Thursday, June 17, 2010
Is That A Wood Fired Soft Pretzel?


I woke up to a dreary cold day with a north wind (according to the weather man)! This is not what I wanted in mid June with my pool and flowers looking so good. I am off from work and can't enjoy my vacation spot in my backyard! But with a little thought I decided this is perfect weather for soft pretzels in the brick oven! I usually wait until fall or late summer when the evening are a little cool for pretzel baking.
I searched for my recipe and grabbed my recipe book and enjoyed the day anyway.
I use a recipe I found on line for the dough and learned some good tricks from my book. The book is called The Pretzel Cookbook by Priscilla Warren. I like all the different types of pretzels and many different recipes in the book. I have made the dough a few times from the book and it is a nice dough and very easy. Today I made a copycat recipe from the internet that is similar to Auntie Annie's from the mall.
Karl starts a nice hot fire and lets it burn down to hot coals. He pushes the coals to the back and lets the oven cool down a bit. The temperature is about is about 400 degrees when we bake the pretzels. I have not mastered pretty pretzels! Karl has not mastered the best way of baking! We some times bake them right on the brick, this works well but they do fall apart and stick. We some times bake them on a baking sheet first and then transfer to the brick, they still stick and fall apart a little! No one seems to care how they look because they taste really really good...
Rolling the dough is fun and frustrating. The dough wants to shrink and we are still not good at a true pretzel shape. The rolled pretzel also must be dipped in baking soda and hot water and if it looked pretty before this dipping it does not look pretty after! To transfer them from the baking sheet to the oven is another step that causes them to look even less like a pretzel. After they bake and puff up they do look look funny but the smell of fresh hot pretzels baking in your own backyard is unbelievable! I like them best when they are dipped in melted sweat cream butter and covered in cinnamon and sugar after baking. I also dip the pretzels in butter and sprinkle with kosher salt for a traditional pretzel. I wish I knew someone who worked at a pretzel place and could come and teach me. Anyone out there willing to give me a few tips?
So here is my recipe and some pictures. I hope you go ahead and try this yourself. If they look better then mine let me know! I hope they taste as yummy as mine and you have as much fun as we do. You will need a Round Boy Oven to make them just like mine and remember I know where you can get one! If you are interested in our ovens feel free to leave a comment and I will help you with your questions and how to purchase one.

Soft Pretzel Recipe
ingredients:
1 1/2 cup warm water
1 1/8 teaspoon active dry yeast
2 tablespoons brown sugar
1 1/8 teaspoon salt
1 cup bread flour
3 cups regular flour
2 cups Warm water
2 tablespoons baking soda
to taste coarse salt
4 tablespoons butter (melted)

Directions:
Sprinkle yeast on lukewarm water in mixing bowl; stir to dissolve. Add sugar, salt and stir to dissolve; add flour and knead dough until smooth and elastic. Let rise at least 1/2 hour.
While dough is rising, prepare a baking soda water bath with 2 cups warm water and 2 Tbsp baking soda. Be certain to stir often. After dough has risen, pinch off bits of dough and roll into a long rope* (about 1/2 inch or less thick) and shape. Dip pretzel in soda solution and place on greased baking sheet. Allow pretzels to rise again. Bake in 450 oven for about 10 minutes or until golden. Brush with melted butter and enjoy!
Toppings: after you brush with butter try sprinkling with coarse salt. or for Auntie Anne's famous Cinnamon Sugar, try melting a stick of butter in a shallow bowl (big enough to fit the entire pretzel) and in another shallow bowl make a mixture of cinnamon and sugar. Dip the pretzel into the butter, coating both sides generously. Then dip again into the cinnamon mixture. Enjoy!

* The longer and thinner you can make the dough rope, the more like Auntie Annie's they will be.
*Sweet butter, not regular butter, is one of her secrets!
This recipe from CDKitchen for Aunt Annie's Soft Pretzels serves/makes 12

This is the finished pretzels dipped in butter and sugar and cinnamon also traditional with butter and kosher salt. They lasted about 15 minutes! Karl, Amanda and I enjoyed them and it made the cool weather in June and a day off from work a perfect day....

Subscribe to:
Posts (Atom)