Thursday, June 30, 2011

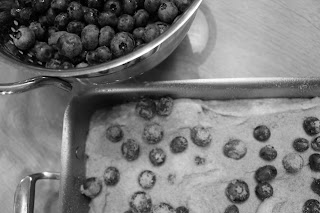
BLUEBERRY BOY BAIT ROUNDBOY OVEN STYLE

 The recipe can be found here Blueberry Boy Bait
The blueberries are from our blueberry patch. The recipe 
from The Smitten Kitchen.
We brought the oven to white hot and removed the fire, letting the oven cool to 400*.

Ready for the brick oven.


We checked in 20 minutes and turned the cake. The cake was done after 15 minutes more.
It worked my boy loved it!

Thursday, June 23, 2011

STRAWBERRY CAKE WITH WOOD ROASTED STRAWBERRY TOPPING

 I love to read blogs and search for new recipes to make in our wood fired oven. Blogs are my favorite place to look because of the great pictures and good directions and suggestions.  I found the Strawberry Cake by Martha Stewart on a blog I discovered The Smitten Kitchen. I found many recipes I can't wait to make in our Roundboy Oven at this blog.

 I made the cake in a cast iron fry pan and it worked well. While the cake was baking I prepared the  Slow Roasted Strawberries from the blog She Who Eats. We Roasted the Strawberries in our Round boy oven of course!
 The wood fired cooking environment is so ideal for fruit recipes.


 Look how nice this cake recipe puffed up in the oven.


The cake was in the oven for 1 hour and the roasted strawberries for another hour after that. All this  from the original fire that Karl made to heat up the oven. He took the fire out and we baked for 2 hours and there was still plenty of heat in the oven to continue baking.  I hope this summer I can do a full course meal all wood fired. With a wood fired brick oven the best part is how well it holds and releases heat over time.  With a little planning this would be a nice dinner party idea. 
   
Martha Stewart you need a Roundboy Oven to prepare this cake!
This is a wonderful summer treat.

Monday, June 20, 2011

WHAT DAY IS IT?

  Karl and I celebrated our 29th wedding anniversary on June 5th. The good thing about this is the past 29 years. The bad thing is that we both forgot! This is not the only time over the years that we forgot our anniversary including our first anniversary. I am not sure I want to dig deep into what this means and for us it is not important. We are always busy with the whatever plans and projects that are going on in our lives. We love each other and our family is what is important for us. I guess you could say we celebrate every day in everything we do. How is that for a Hallmark greeting card?

  Father's Day was not much different. K.C. was home for Saturday and Karl enjoyed seeing him and spending time with him. Amanda came home from Texas and spent Saturday morning picking strawberries with her dad and for Karl that is what is important to him. He loves that our children are close to us. They really are our world! Sunday Karl worked on some landscaping and built the water fall he promised me years ago. He trimmed the weeping willow tree by the pond. As we sat under the weeping willow tree and admired the waterfall I thought this is a wonderful anniversary present. It wasn't a fancy way to celebrate or even a relaxing Father's day for Karl but this is our way and I like it!

  Thinking about the passion we have for our Roundboy Oven business and how hard we have worked to build it seems no different then the things that we value everyday. We love being with our family and our friends, we love being proud of something we create ourselves that can be as little as a good pizza or a new bread recipe or as big as a wood fired oven designed and built in a little shop in Ashley, Pa. I don't know if everyone would want a wood fired oven in their backyard but if you like to create a new recipe to share with your family or enjoy the morning picking strawberries with your daughter while she talks about the big new world she is discovering or helping your son with his car on a Saturday afternoon then I think you would like the simple enjoyment the oven brings to you and your family and friends. A change of pace in a hectic world,
a chance to enjoy what is outside your back door and often overlooked. 
This weekend Karl will rake and mulch the new flower bed and another project finished.
Sitting under the weeping willow feels like you stepped into the air conditioning on a hot day.
The view looking up!
The new water fall!
Blueberries are coming along great. I see wood fired blue berry dessert coming soon......

Monday, June 13, 2011

Mmm Brick Oven Bread!

Baking bread can be very easy. I look for books and recipes that are written for the novice baker and they make the task fun. I find that baking and cooking is a great way to take your mind off your worries (today that was Amanda flying to Texas on her first business trip for her first "real job".) As soon as she landed I could let my mind wander and enjoy my thoughts while ending up with something delicious that I am proud of.
I don't think I would ever have made bread if we didn't discover wood fired baking. Having the Roundboy Oven and the whole idea of baking old world style was so appealing to me. I always enjoyed baking as a hobby over cooking, I like how precise it is. Following exact directions and getting lost in my thoughts is my way of relaxing. The brick oven brings Karl into my hobby and we both enjoy it so much. 
Today we made Oatmeal Molasses bread and Buttermilk and Cinnamon Raisin bread. 
I don't have pictures of the bread in the oven because just as we put it in the oven the sky opened up to a downpour! We were able to fit 2 large loaves and 3 small loaves into the oven at the same time. The bread was delicious and there is nothing better then the aroma of fresh baked bread (except eating fresh baked bread).  
The bread is ready to start rising.
Risen and ready for the oven.
A little too browned on the top but that is part of wood fired baking!
We cut the cinnamon raisin right away. Warm, gooey and delicious!
Buttermilk
Oatmeal Molasses.
  Pizza for dinner after a day baking bread!

Thursday, June 9, 2011

CREATIVE ROUNDBOY OVEN OWNERS

This past week we had the pleasure of seeing more beautiful backyard homes for our Roundboy ovens. It is really fun to see how creative our customers are! I love seeing the pictures and hearing about everyone's first pizza. I thought I would share a few pictures with you and there are more pictures on our facebook page I think you will enjoy the step by step of the oven being assembled and seeing how easy it really is. A big "Thank You" to our new friends for their beautiful pictures!
 

Wednesday, June 1, 2011

Homebrewing Beer - Part 1

Along with making baby-back ribs this weekend, my son K.C. decided to try his hand at homebrewing a batch of beer. Afterall, few things go quite as well with wood-fired pizza as a cold beer.

Since it was his first try at it, he decided to go with a beer using malt extract, if all goes well, he may try brewing an all-grain beer later this summer. He purchased most of his equipment and the ingredients from Midwest Supplies who were really very helpful in the process.

The recipe was a Belgian Trappist style Ale using Belgian candi sugar and a mix of Caramel & Carapils specialty grains with a pilsner malt extract.

All of the ingredients ready to go.
He heated up about 5.5 gal. of water to 155 degrees. Fortunately, we had a turkey fryer & propane burner which made the process really easy. It heated up quickly, the pot has a convenient spigot and he was able to do it all outside - no mess!

Once the water was heated up, it was time to steep the specialty grains. The grains are kept in a muslin bag. He did this for approx. 30 minutes.

Once that was done, it was time to add the malt extract to the "beer" which at this stage is called wort. The wort is then brought to a boil and the bittering hops are added. In this case, he used 2oz of Hellertau hops and continued to boil for 60 mins.

Boiling wort w/ Hellertau hops. The hops are kept in a cheesecloth bag.

By now the boiling hops & wort were beginning to look & smell like beer. The hops had a really fragrant, almost floral smell.

During the last 10 mins of the boil, he added the Belgian candi sugar. The candi sugar will increase the alcohol content of the beer (more sugars for the yeast to convert to alcohol) but at the same time balance it with sweetness.

During the last 2 mins of the boil, he added aroma hops. In this case, he used 1oz of Styrian Golding hops. These hops will give the beer a great aroma without increasing bitterness.

At this point, the beer must be cooled to less than 80 degrees before pitching the yeast into the wort. One of the best ways for a homebrewer to do this is using a wort chiller. This is basically a copper coil that you run cold water through. This helps to rapidly cool the wort which in turn will help give the final beer more clarity. If you don't want to spend a little extra for a wort chiller, a cold ice bath will work as well.

Chilling the wort
Now time for the yeast to do their job. He used Safbrew T-58 dry yeast for this beer. He had planned to use a liquid yeast for the beer - White Labs Trappist Ale #500 - but when the shipment arrived our mailbox had been vandalized and the yeast was no longer viable. The dry yeast can just be sprinkled over the top of the wort. Then seal the bucket and be sure to add an airlock! At this point, its time to wait for the yeast to do their job. By the next morning, there were already bubbles in the air lock meaning the yeast was busy turning the wort into delicious beer.

Sealed ale pail w/ airlock - hope the yeast are hungry!
After a few days, he plans to rack the beer in a secondary fermenter - meaning, once the yeast have done their job, he'll move the beer into a different container to allow it to age a few weeks away from any byproducts of the fermentation.

Prior to adding the yeast, we checked the wort's original gravity with a hydrometer. This is a measure of density which can be used to calculate the amount of un-fermented sugar in the beer. Knowing the original gravity sets a basis to later determine whether fermentation is completed.

The most important thing in this whole process is to be sure everything that the wort comes in contact with has been sanitized. Prior to doing all this, he spent a few hours cleaning everything with a brewery safe sanitizing solution. Even the liquid in the airlock is a sanitized solution to minimize any chance of contaminating the wort as it ferments.

Stay tuned over the next few weeks for updates on the progress of the beer, bottling day, and finally our first tastes of homebrewed beer!
WOOD FIRED BABY BACK RIBS

The recipe:
Nino Salvaggio Baby back ribs

The key ingredients:  
The Baby Back ribs:
A lazy day by the pool and ribs made in our wood fired oven are a perfect combination. Karl gets the oven hot and removes all but a small fire with some natural charcoal. The ribs cook all day at a temperature around 300*. We add some potatoes wrapped in foil and later some vegetables in foil. When we are done swimming dinner is ready!