Friday, December 17, 2010

Wood Fired Thanksgiving Feast

For Information on RoundBoy Brick Ovens call Karl 570-885-3269 or Harry 570-885-3268
I wanted to try roasting a turkey in the brick oven all summer. We never got around to trying a turkey in the oven because we enjoy pizza and steak so much! Roasting a turkey on Thanksgiving when we have guest for dinner was a little scary. The solution was a turkey breast done in my Jenn Air and another breast done wood fired outside in our brick oven. Both took about the same time and both had the same preparation and seasoning. The breast was a honey brine fresh turkey breast from Wegmans. I used a seasoned rub. The results were told by the fact that the only leftover turkey was the Jenn Air roasted breast. The wood fired breast was amazing! I wish you could taste the difference yourself because I do not have he words to describe the flavor! I loved that it would free up my Jenn Air for other dishes. I loved that Karl and Amanda were in charge of the brick oven and it was one less thing for me to think about. I loved how great it tasted!
I am still amazed out how good everything comes out when we make it in the brick oven. We really enjoy this oven as a family. I am so happy that it brings my kids back home! Karl and I are not big vacationers and having something else we enjoy in our back yard for us is better then going away on vacation! 
Karl brought the oven up to white hot (bricks on top of oven inside turn white). He let the oven cool to 475* to 500* and kept a small fire going while roasting the turkey. He did not use a door on the oven. I coated the turkey with olive oil and used a seasoned salt rub. I placed the turkey on a rack in a roasting pan and covered with foil. Karl turned the turkey every 1/2 hour. He removed the foil the last hour to let the turkey brown. It roasted for about 3 hours and a internal temperature of 165*. We let it sit for a 1/2 hour and sliced. The turkey was a little pink by the skin because it was wood fired.
Keep a small fire while roasting and turn every 1/2 hour

Internal temperature of 165*


Perfect

Charlie taking a break from watching the brick oven to enjoy the snow.

Wood fired also!

Monday, November 1, 2010

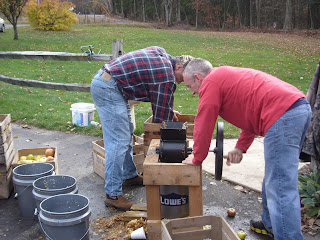
2nd Annual O'hara Orchard Cider Making Day!

Fresh hot apple pie!

Everyone enjoyed the day and took home apples and pie

This Round Boy Oven should be retired to the museum!

Fun in the leaves!

Hard at work

Mmmmm

The deer will love this!

Lots of apples to go!

Thanks Chris and Joe for a great Fall day!
Waiting for pizza....

Sunday, October 10, 2010

Chicken under a Brick!

 For information Contact Karl 570-885-3269
Before I get to the Chicken under a Brick I want to talk about Round Boy Ovens! We now have ovens in Canada, Arizona, New York, New Jersey, Las Vegas,Ohio, Pennsylvania and Tennessee! It has been so much fun talking to people from all these places and I feel like we have made some wonderful friends. I hope I can enjoy some of the recipes they create in their ovens! Of course I will share them! I was happy to hear how easily the oven went together for everyone and our directions and pictures were a success.  If you haven't bought a Round Boy Oven for your backyard yet, you are missing out on a great way to entertain and enjoy your own backyard. Fall and winter are still great for wood fired cooking. I like this time of year to roast meals and also bread baking. last year Karl shoveled a path the the oven and we used it all winter long
Chicken under a brick seemed very interesting to me when I read the recipe. It came from my favorite wood fired oven book - THE ART Of WOOD FIRED COOKING by Andrea Mugnaini.
 We also made roasted asparagus and roasted potatoes from the same book. What a feast we had! The preparation was so easy and the clean up even easier for a meal that looked and tasted like we spent hours. The tricks to the chicken were to have a whole chicken deboned by the friendly butcher at Wegmans and the Aromatic salt recipe from the book. The fire was easily managed and all of this was in the book. Oh and the bricks on top of the chicken was the best trick!
We started the fire and brought the oven up to pizza temp. and then kept a vertical flame extended up the wall only and the temp. at the floor of around 550* We kept adding small wood to keep the flame extended up the wall and maintain our temp of 550*
We started with our roasted potatoes first because they took about 30 minutes. The chicken was next heating the bake sheet in the oven first then adding the chicken with 2 bricks covered in foil on top for the first 15 minutes. We removed the bricks and roasted for another 30 minutes. Last we put in the asparagus! The next time I make this meal I will use smaller pans and keep the potatoes and chicken in the oven farthest from flame while the other items roast. This time I took them out and put in my regular oven to keep warm.
The recipe for the Aromatic Salt used to season the chicken
2 cups fine sea salt
1 cup finely chopped mixture of rosemary,sage,thyme, and parsley
1 lemon for zesting
Place salt and herb mixture on a sheet and toss together. Hold lemon over salt mixture and zest. Toss again. Mixture can be used now or dried at room temp. for 48 hours and kept in fridge for use later.
I hope you enjoy!


Sunday, October 3, 2010

Apple Dumplings!

A beautiful Fall day a brick oven and apple dumplings! Enough said!

Apple Dumplings

2 cups flour
2 tsp. baking powder
1tsp. salt
2/3 cup Crisco
1/2 cup milk
6 medium Cortland or Mutsu apples

Cut shortening into flour, salt and baking powder. Add milk. roll onto a floured counter into a rectangle. Cut into 6 squares.
Core and peel apples. Place apple onto a square of pastry. Pull opposite corners up to meet and fold pastry over apple, crimp edges. Place in a 9x13 baking dish.

Sauce
1 1/2 cups water
1 1/2 cups sugar
1/4 tsp. cinnamon
1/4 tsp. nutmeg
3 TBS. butter
Bring to a boil. Pour sauce over dumplings. Bake at 375* for 35 to 40 minutes.

Oven prep. Fire oven until dome turns white. Take the fire out and put the door on and block chimney. Wait 1 hour for the heat to even out and cool down to 425*. We baked the dumplings uncovered in 13x 9 pan for 45 min. with the door and chimney closed.  The apples were still a little crisp.
Before baking


Mmmmm!
The leaves are starting to turn colors